Developer’s Manual
Note: We assume that you already have gone through the User’s Manual to not repeat ourselves.
Gazebo Plugin
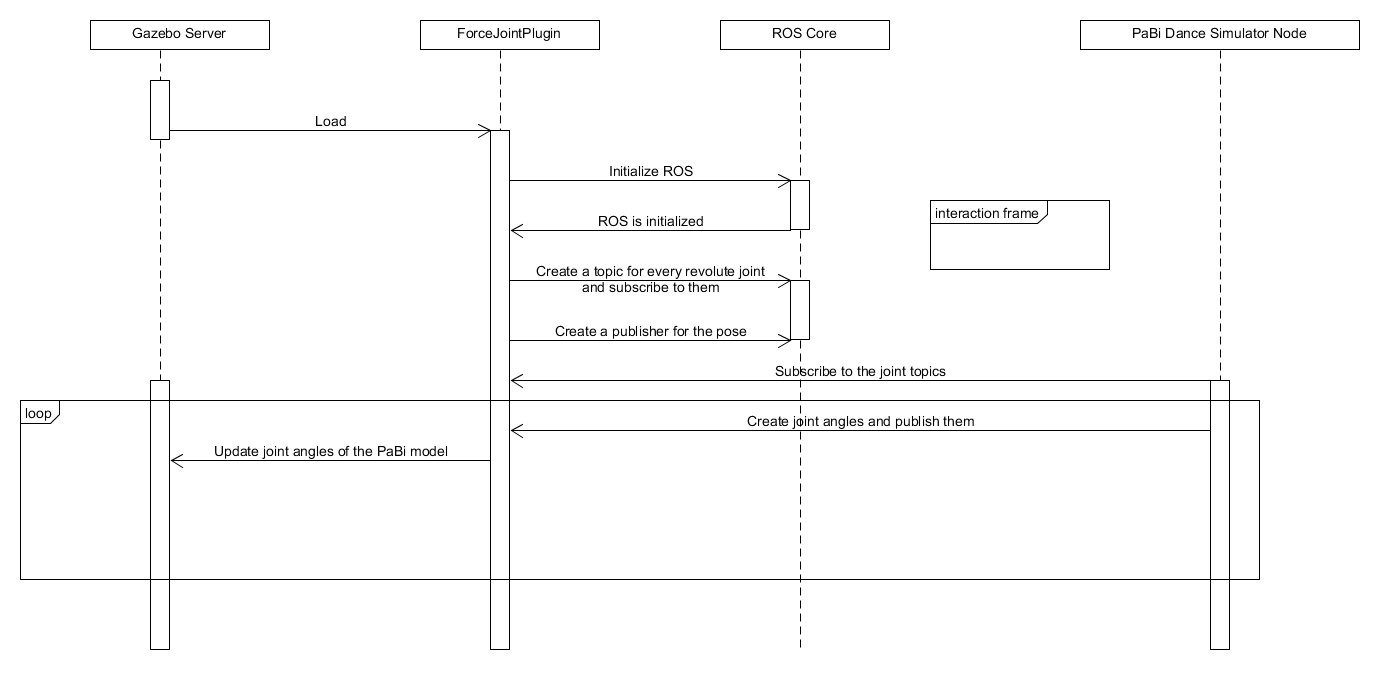
Sequence diagramm of the ForceJointPlugin
The main part on the simulation site is the plugin ForceJointPlugin. The location is:
path-to-roboy-ros-control/src/roboy_simulation/src/ForceJointPlugin.cpp
The plugin does the following:
- It loads the model into Gazebo.
- It starts one topic for all revolute joints of the PaBi model. That means you have only one topic for all joints at once.
- It subscribes to the created topic.
- It creates a publisher which publishes the pose of PaBi so we can subscribe to the topic on the Unity side.
- It makes PaBi stationary so he does not fall down when the legs are not touching the ground.
The topic name for the joint commands with type roboy_communication_middleware::JointCommand is:
/roboy/middleware/JointCommand
The JointCommand expects an array of the link names and one value for each given link, meaning in the case of PaBi you need four values in both arrays.
The pose is published with message type roboy_communication_simulation::Pose on the topic:
/roboy/pabi_pose
The main functions of the plugin are:
- Load: It loads the model into gazebo and creates the joint subscribers and the pose publisher.
- JointCommand: Is called every time the plugin receives a joint command. It updates the joint angles value list and publishes the new state.
- publishPose: Publishes the pose of PaBi.
4) OnUpdate: Is called every gazebo update frame. Therefore we have to zero out the forces of PaBi and update the joint angles of the actual model.
Change the following line in OnUpdate if you want PaBi to be able to fall down:
model->SetWorldPose(initPose);
PaBiDanceSimulatorNode
This ROS node creates four publishers for the joints of PaBi. In the Main loop it publishes new joint angles. To make the movement smooth the published joint angles are changed gradually in small steps from -90° to 0° and back. Therefore we have two functions. One to start the animation:
void PaBiDanceSimulator::startDanceAnimation()
{
    while(ros::ok())
    {
        if(adjustPoseGradually(true))
            adjustPoseGradually(false);
    }
}
And another to adjust the pose:
bool PaBiDanceSimulator::adjustPoseGradually(bool goUp)
{
    float stepSize = 1;
    int sleeptime = 10000;
    // adjusts the joint angles to -90° in 90 * stepSize * 0.01 seconds
    if(goUp)
    {
        float currentAngle = 0;
        while(currentAngle > -90)
        {
            publishAngles(currentAngle);
            usleep(sleeptime);
            currentAngle -= stepSize;
        }
    }
    else
    {
        float currentAngle = -90;
        while(currentAngle < 0)
        {
            publishAngles(currentAngle);
            usleep(sleeptime);
            currentAngle += stepSize;
        }
    }
    return true;
}
Unity Scene
In Unity we have the ROSBridge which connects to the ROSBridge on the simulation side. On the PaBi legs we have a ROSObject script attached to the legs.
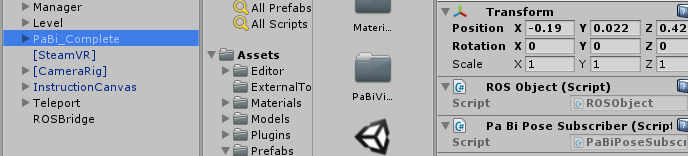
ROSObject component
This script is needed because the ROSBridge searches for every ROSObject in the scene and adds every ROS Actor (Subscriber, Publisher, Service) on this object. So f.e. if you want to add your own subscriber you have to write the subscriber such that it derives from ROSBridgeSubscriber and define on which topic you subscribe, which message type the topic has and what happens at a callback meaning when you receive a message.