Developer’s Manual
Are you sure you want to go down that road? This will be though, are you prepared? Yeah? So follow me if you want to bring the BeRoboy™ development forth.
Note: We assume that you already have gone through the User’s Manual to not repeat ourselves.
Gazebo Simulation
For the gazebo part you need to create/ edit a launch/ world file(s). When the launch file is started it automa- tically loads the world (with all the surrounding objects) that has been specified and the version of roboy you have chosen.
Example for a launch file: This launch file would load camera.world and set also some start parameters for the gazebo simulation, for example it would start it in a not paused stated (“paused” set to “false”).
<launch>
        <include file="$(find gazebo_ros)/launch/empty_world.launch">
        <arg name="world_name" value="$(find roboy_simulation)/worlds/camera.world"/>
        <arg name="paused" value="false"/>
        <arg name="use_sim_time" value="true"/>
        <arg name="gui" value="true"/>
        <arg name="headless" value="false"/>
        <arg name="debug" value="false"/>
        </include>
        <include file="$(find rosbridge_server)/launch/rosbridge_websocket.launch"/>
</launch>
Example for a world (camera.world) file: In this case the world file contains a ground plane, the legs with upper body roboy model and a light source, a sun.
<world name="default">

<!-- A ground plane -->
<include>
    <uri>model://ground_plane</uri>
</include>
<!--PabiRoboy -->
<include>
    <uri>model://Roboy_with_camera_simplified</uri>
</include>
<!--Sun -->
<include>
    <uri>model://sun</uri>
</include>


<!-- Focus camera on tall pendulum -->
<gui fullscreen='0'>
    <camera name='user_camera'>
        <pose>4.927360 -4.376610 3.740080 0.000000 0.275643 2.356190</pose>
        <view_controller>orbit</view_controller>
    </camera>
</gui>
</world>
Model Configuration
If you want to see a camera feed from a gazebo simulation you need to have a camera sensor that captures images and publishes them via messages over a ros bridge. Those messages a standard sensor messages. You can refer to a gazebo plugin that has already been implemented. It is re- commended to attach this sensor to a position close to the models head because you want to its POV to maximize the POV experience. To implement such a thing, just open the model.sdf of the specific model you want to have in the simulation and add the following section.
<sensor type="camera" name="camera">
      <update_rate>3.0</update_rate>
      <camera name="head">
        <pose>0 1.25 0 -1.5707963267948966 -1.5707963267948966 0</pose>
        <horizontal_fov>1.6962634</horizontal_fov>
        <image>
          <width>640</width>
          <height>480</height>
          <format>R8G8B8</format>
        </image>
        <clip>
          <near>0.1</near>
          <far>100</far>
        </clip>
        <noise>
          <type>gaussian</type>
          <!-- Noise is sampled independently per pixel on each frame.
               That pixel's noise value is added to each of its color
               channels, which at that point lie in the range [0,1]. -->
          <mean>0.0</mean>
          <stddev>0.007</stddev>
        </noise>
      </camera>
      <plugin name="camera_controller" filename="libgazebo_ros_camera.so">
        <alwaysOn>true</alwaysOn>
        <updateRate>0.0</updateRate>
        <cameraName>roboy/camera</cameraName>
        <imageTopicName>image_raw</imageTopicName>
        <cameraInfoTopicName>camera_info</cameraInfoTopicName>
        <frameName>camera_link</frameName>
        <hackBaseline>0.07</hackBaseline>
        <distortionK1>0.0</distortionK1>
        <distortionK2>0.0</distortionK2>
        <distortionK3>0.0</distortionK3>
        <distortionT1>0.0</distortionT1>
        <distortionT2>0.0</distortionT2>
      </plugin>
</sensor>
The pose determines where the camera will be looking at and which perspective it will be publishing messages from. In order to publish images the camera sensor needs a plugin attached to it, in this case its a standard plugin-in, the ros camera from the gazebo library. The width and height tag determine the resolution of the published images, the update rates is crucial to how many images are sent in one second (25 means, 25 updates per second).
In order to control Roboy in the simulation via ROS messages, the respective model needs to have the suiting plugin.
#include "roboy_simulation/BeRoboyPlugin.hpp"
#include <math.h>

using namespace std;
using namespace gazebo;

GZ_REGISTER_MODEL_PLUGIN(BeRoboyPlugin)

BeRoboyPlugin::BeRoboyPlugin() : ModelPlugin() {}

BeRoboyPlugin::~BeRoboyPlugin(){}

void BeRoboyPlugin::Load(physics::ModelPtr _parent, sdf::ElementPtr _sdf)
{
        // get the model
        model = _parent;
        // bind the gazebo update function to OnUpdate
        updateConnection = event::Events::ConnectWorldUpdateBegin(boost::bind(&BeRoboyPlugin::OnUpdate, this, _1));
        // get all joints and the initial pose
        physics::Joint_V jointVector = model->GetJoints();
        initPose = model->GetWorldPose();

        // Init ros if it is has not been initialized
        if(!ros::isInitialized())
        {
                int argc = 0;
                char **argv = NULL;
                ros::init(argc, argv, "BeRoboy");
        }

        // Create ros node
        nh = ros::NodeHandlePtr(new ros::NodeHandle("BeRoboy"));
        spinner = boost::shared_ptr<ros::AsyncSpinner>(new ros::AsyncSpinner(1));
        spinner->start();

        jointCommand_sub = nh->subscribe("/roboy/middleware/JointCommand", 1, &BeRoboyPlugin::JointCommand, this);
        setPosition_sub = nh->subscribe("/roboy/middleware/Position", 1, &BeRoboyPlugin::SetPosition, this);
        pose_pub = nh->advertise<roboy_communication_middleware::Pose>("/roboy/simulation/"+ _parent->GetName() +"_pose", 1);
        hip_sub = nh->subscribe("/roboy/middleware/DarkRoom/sensor_location", 1, &BeRoboyPlugin::DarkRoomSensor, this);
        for(auto joint = jointVector.begin(); joint != jointVector.end(); joint++)
        {
                // Test if joint type is revolute
                if((*joint)->GetType() != 576)
                        continue;
                // replace whitespace with underscore in the names
                string _modelName = model->GetName();
                string jointName = (*joint)->GetName();
                string _jointName = jointName;
                boost::algorithm::replace_all(_modelName, " ", "_");
                boost::algorithm::replace_all(_jointName, " ", "_");
                joints.push_back(jointName);
                jointAngles[jointName] = (*joint)->GetAngle(0).Radian();
        }
}

void BeRoboyPlugin::publishPose()
{
        roboy_communication_middleware::Pose msg;
        for(auto link:model->GetLinks()){
                msg.name.push_back(link->GetName());
                math::Pose p = link->GetWorldPose();
                msg.x.push_back(p.pos.x);
                msg.y.push_back(p.pos.y);
                msg.z.push_back(p.pos.z);
                p.rot.Normalize();
                msg.qx.push_back(p.rot.x);
                msg.qy.push_back(p.rot.y);
                msg.qz.push_back(p.rot.z);
                msg.qw.push_back(p.rot.w);
        }
        pose_pub.publish(msg);
}

void BeRoboyPlugin::JointCommand(const roboy_communication_middleware::JointCommandConstPtr &msg){
        for(uint i=0;i<msg->link_name.size();i++){
                jointAngles[msg->link_name[i]] = msg->angle[i];
        }
}

void BeRoboyPlugin::SetPosition(const roboy_communication_middleware::PositionConstPtr &msg){
        math::Vector3 pos(msg->x, msg->y, msg->z);
                gazebo::math::Pose p(pos, initPose.rot);
        initPose = p;
}

void BeRoboyPlugin::DarkRoomSensor(const roboy_communication_middleware::DarkRoomSensorConstPtr &msg)
{
        int hipIDPos = -1;
        for(int i = 0; i < msg->ids.size(); i++)
        {
        // hip id of the sensor should be 4
        if(msg->ids[i] == hipID)
        {
                hipIDPos = msg->ids[i];
                break;
        }
        }
        if(hipIDPos == -1)
        return;

        // move the position of the model
        math::Quaternion modelRot = model->GetWorldPose().rot;
        math::Vector3 modelPos = math::Vector3(msg->position[hipIDPos].x, msg->position[hipIDPos].y, msg->position[hipIDPos].z);
        initPose = math::Pose(math::Pose(modelPos, modelRot));
}

void BeRoboyPlugin::OnUpdate(const common::UpdateInfo &_info)
{
        // make the model stationary
        model->SetWorldPose(initPose);
        // set velocity and force to zero and force for every saved joint and set angle to saved value
        for(auto it = joints.begin(); it != joints.end(); it++)
        {
                model->GetJoint(*it)->SetVelocity(0, 0);
                model->GetJoint(*it)->SetForce(0, 0);
                model->GetJoint(*it)->SetPosition(0, jointAngles[*it]);
        }
        initPose = model->GetWorldPose();
        publishPose();

}
Unity Scene
In Unity you need to establish a Rosbridge in order to be able to communicate with the various types of Roboy, e.g. the simulation one or the real one. Both of them are sending their camera feed as Image messages of the type sensor_msgs/Image. Therefore you need also a suiting subscriber in Unity to be able to receive the messages correctly and parse them afterwards in the right manner.
Image message in Unity
namespace ROSBridgeLib
{
        namespace sensor_msgs
        {
                public class ImageMsg : ROSBridgeMsg
                {
                        ...
                        ...

                        public ImageMsg(JSONNode msg){...}

                        public ImageMsg(HeaderMsg header, byte[] data){...}

                        public byte[] GetImage(){...}

                        public static string GetMessageType(){...}

                        public override string ToString(){...}
                        public override string ToYAMLString(){...}
                }
        }
}
Image Subscriber in Unity
namespace ROSBridgeLib
{
        public class RoboyCameraSubscriber : ROSBridgeSubscriber
        {
                public new static string GetMessageTopic()
                {
                        return either "/roboy/camera/image_raw" or "/zed/rgb/image_raw_color"
                }

                public new static string GetMessageType()
                {
                        return "sensor_msgs/Image";
                }

                public new static ROSBridgeMsg ParseMessage(JSONNode msg)
                {
                        //ImageMsg from sensor messages lib
                        return new ImageMsg(msg);
                }

                public new static void CallBack(ROSBridgeMsg msg)
                {
                        ImageMsg image = (ImageMsg)msg;
                        //ReceiveMessage respectively either for the simulation or zed image
                        BeRoboyManager.Instance.ReceiveMessage(image);
                }

        }
}
After getting the ros bridge connection right and being able to receive image messages as well as reading them correctly the camera feeds should be displayed and rendered at at suited position. For this purpose this unity scene uses a canvas in camera space. Attached to this canvas are various image planes (unity ui images) that can wrap up the received messages.
There is also a View Selection Manager embedded to the BeRoboy™ scene, it is used to fluently switch from one view to another. This manager is responsible for the procedures after a button on the 3D selection menu is pressed. When a certain button is invoked by onClick() the state of various different game objects needs to manipulated (mostly enabling or disabling them). A View Selection Manager always needs the desired references in order to set them, if they not already come preconfigured.
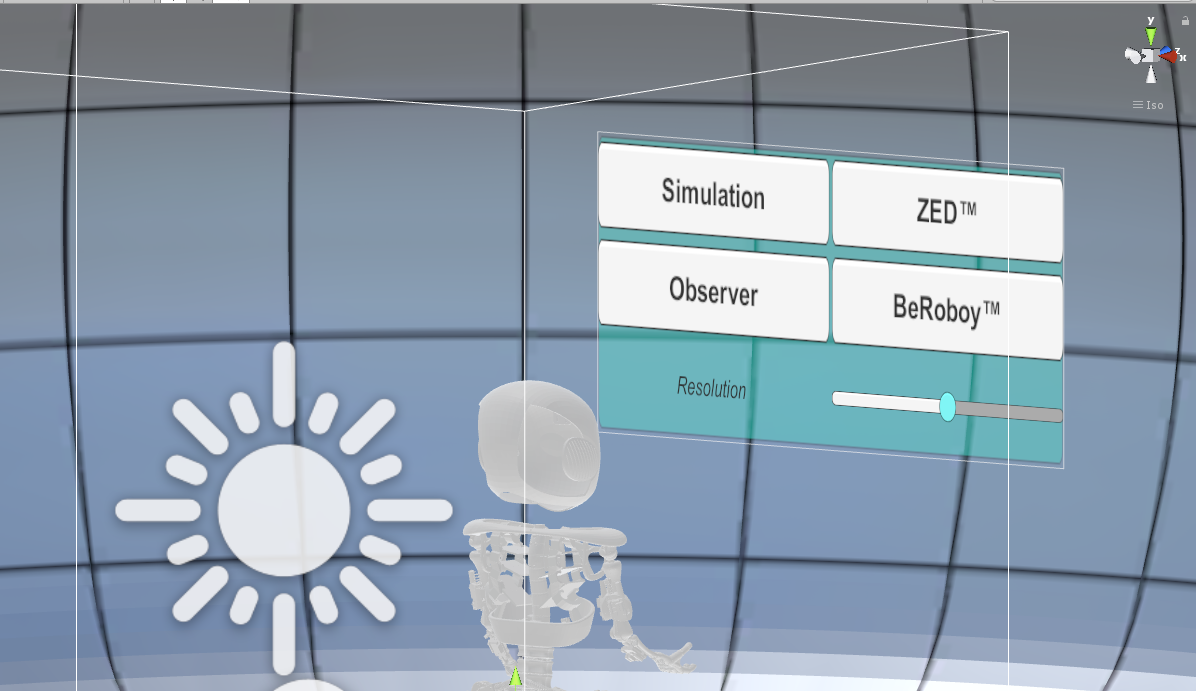
After clicking on one of the buttons, the View Selection Manager takes the necessary steps to change to the respective view.
Receiving Images Info
Depending on what images you want to receive, you need to set the size of the color arrays in the BeRoboyManager class. m_colorArraySample = new Color [width*height]
In addition you also need to set the texture size in Awake() respectively m_texSample = new Texture2D(width, height)
SelectionWheel
The selection wheel class is a generic approach to bundle items into a circle based selection. You can of course modify the class or create your own custom selection wheel but for the most part it should work out of the box if you define certain classes. There are basically two main classes for the SelectionWheel items. At first, you need the actual item with working functionality. In our case it is always a tool. This class needs an icon which will be the representation of the item in the selection wheel.
Then you need the UI counterpart item. As the SelectionWheel itself bundles the UI parts and calls the corresponding classes depending on the action of the user. To be more specific, the UI part knows three states: Unhighlighted, Highlighted and Selected. Depending on the state change it calls the corresponding method: Highlight(), Unhighlight() etc. In this class you have to define the behaviour of the UI, meaning what color it should have depending on the state, possible animations, debugs etc. On top of that it should call the same method in the actual part which triggers some logic change etc. For example in our case we have defined a SelectionWheel to change between Tools. This means that in the UI part we just do basic color switches and in the actual part we call a method from InputManager to change the current tool to the selected one.